› Forums › Barracuda Stuff › Restoration Projects › A2R Restoration
- This topic is empty.
- Post
-
- May 23, 2011 at 5:17 am
Now that I’ve found this site and realize that the chances of seeing another ‘cuda out and about is incredibly small, I think I’ll go ahead and do a full restoration on my A2R as opposed to just a basic overhaul-tune to get riding again.I’ve posted a couple pics over in the Serial Numbers section.
The question becomes, refurbish, replace with same, or upgrade parts?
Some parts will need to be replaced though, as I absolutely destroyed the grip shift/brake assembly on the left side in a bad wreck back in college and replaced with the cheapest stuff I could get at the time. I’ll post that story up in the the appropriate place.
- Replies
-
- May 23, 2011 at 11:55 pm
Well…. 🙄 All who knows me, know I am a fan of restoring close to stock. But I have to say this. I own a 95 A2R very similar to yours and am debating the restoration as well. Not to put yours down: I dislike the grip shift system all together. That will be the first thing I off on mine and will replace with LX or XT shifters. Another thing is mine has a steering stem that rivals the dogbones on Wyatt’s Captain America Harley in the Easy Rider movie. 🙄 It will be going away. My paint is highly oxidized so probably needs repaint. But if it culd be buffed out or have shot with clear, that’s what I would do.- May 24, 2011 at 2:03 am
@mixalive wrote:…I dislike the grip shift system all together. That will be the first thing I off on mine and will replace with LX or XT shifters.…
The GripShift system was one of my favorite features of the bike, having this cheap replacement always kinda bugged me, not as much as being the reverse order as the original though!
The replacement stuff:

If you want to sell the parts off, I might be interested in buying those from you. I imagine there’s not a lot different between ’95 and ’96 on those.
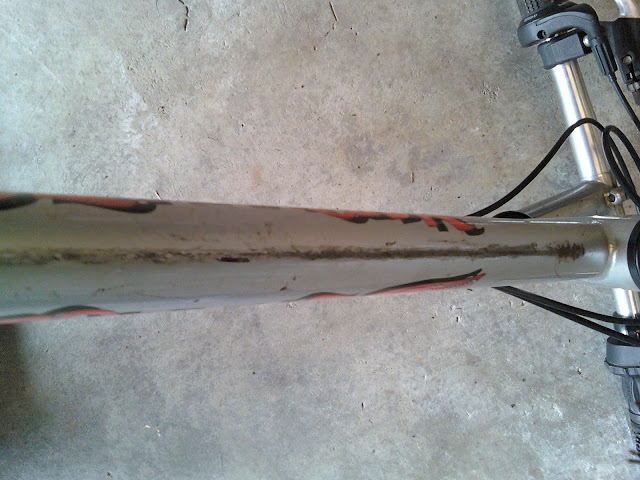
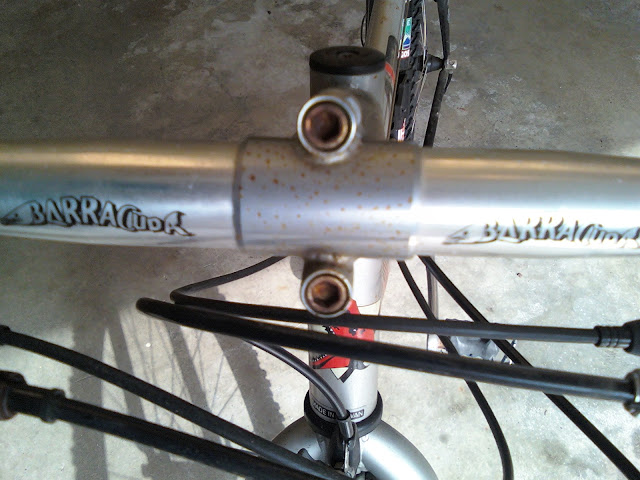
Here’s some rust pics:
Underside
Standover

- May 24, 2011 at 4:23 am
Yep. Looks like a repaint.. But you know.. I kinda like the beat up look.
I think my grip shifts are original. The right one seems to have some scuffing. But they both work. I will take some pictures and post on this thread for you. Do you have your old original units?On the year models: My bike looks exactly like yours. They may be the same year model. I will compare our serial numbers.
- May 25, 2011 at 1:26 am
Thanks Mix. Now that you mention it, the bike does look tougher all beat like this. What’s not evident in the pics is how faded the decals are.The original for right/rear is still on the bike. The original for the left/front is long gone, I destroyed it in my worst bike wreck ever.
- May 25, 2011 at 3:05 am
I know the bottom of the down tube might look bad but no one see’s that. The paint on the top tube looks pretty good except for the rust spots. If it were me, I would try some fine rubbing compound on one of those spots to try to clean the paint of the surrounding rust stain. If it cleans it up and just leaves the rust pit, you may be in business. Try to clean the rust pit out a bit and dab some lube on the pit to try to retard the rusting. If that works, buff the whole thing out and wax it. I use this expensive compounding product from 3M called Finesse It. It is actually designed to take paint or clear coats from 1500 sanded to shine. Pretty bad ass stuff, but expensive. Have to purchase from a body paint jobber like Tasco. You might be able to get a few years out of the paint before you have to repaint.- May 25, 2011 at 12:50 pm
You’re getting great advice, but I’ll speak for the other folks that want to see yet another kick ass restoration!!!")
- June 3, 2011 at 5:54 am
So I took lots of pics of the decals with rulers tonight so I have plenty of reference for size and placement. I’m planning on dropping the frame and fork off to be media blasted this weekend. (assuming the shop can fit the frame in their booth)I also found plenty of rust inside the tubes
 Luckily nothing seems to be anything more than surface rust, but we all know rust never sleeps. I might try to find some aerosol POR-15 or similar to spray in there, but the tight access might kill that idea.
- June 3, 2011 at 12:31 pm
What about an acid dip at like a chromer. That would get the rust out.- June 4, 2011 at 12:59 am
@mixalive wrote:What about an acid dip at like a chromer. That would get the rust out.
The shop I called today just said it would only rust again. I figure I’ll just have to use some rust-converting primer on my own. Not a big deal, just a little more effort on my part.
- June 4, 2011 at 1:41 am
Hey,I can add some info to this rusty discussion, God knows I’ve messed with enough surface rust on my ’57 F100, I was turned onto this product and it works awesome for what you’re needing to do. The rust miracle worker is Jasco Rust & Prep, here is a link:
http://www.wmbarr.com/product.aspx?catid=103&prodid=221
Grab yourself some gloves as it can splash, an inexpensive/disposable brush (I used a chip brush), and a small open top container. Simple slap the Jasco on all the rusty bits and let it sit overnight (if you can). In the morning all the rust will be workable metal again. I used a metal brush before the Jasco to get off any rust flakes, after the first coat of Jasco I used the wire brush again, and then I did a second coat and let that sit. The following morning I started sanding the metal, I kept going until I had a nice surface for a buildable primer. It truly couldn’t be any easier! You’re not removing the rust as much as you’re converting it back into metal… old steel dream come true!!!
Good luck!
-DON-
p.s. Take some process pictures (if you choose to use the Jasco) along the way, so we can see how yours comes out… thanks!
- June 4, 2011 at 2:08 am
I was doing this restoration on a 79 454 El Camino in early 2000’s. I removed the front section (that holds the headlights and radiator) and found battery acid rust way deep in the cracks that sandblast couldn’t reach. I poured muratic acid (swimming pool acid from Home D.) in the cracks, let it set for 5 minutes then rinsed it out with water (at a distance of course). Once dried, I poured that POR-15 BlackCoat into the cracks and that dude is still driving that hotrod around.
If you heat that POR up real good, you could inject pretty easy into those little holes in the frame.- June 4, 2011 at 4:21 am
Thanks for the tips, guys!I wish I could get POR-15 locally. Home D. had some Rustoleum Rust Reformer aerosol, which would be fine, except I’ll never get the nozzle in a position that will work. I did pick up some Krud Kutter rust remover from wally world. This stuff contains phosphoric acid :ugeek: I just hope it doesn’t eat duct tape!
I figure I’ll blast as much out of the tubes as I can with my compressor, close off one end (tape!) and pour in the chems on the other. Then close that end off and slosh it around to attempt to coat the entire inside surface…one tube at a time
Also, does anybody think I should restore the “Made in Taiwan” sticker while I’m at it?
It’s at the base of the head tube.
- You must be logged in to reply to this topic.